最近用 SwiftUI 做了一个 Terminal 终端,挺有意思的,分享下实现思路。
效果大概是这样:
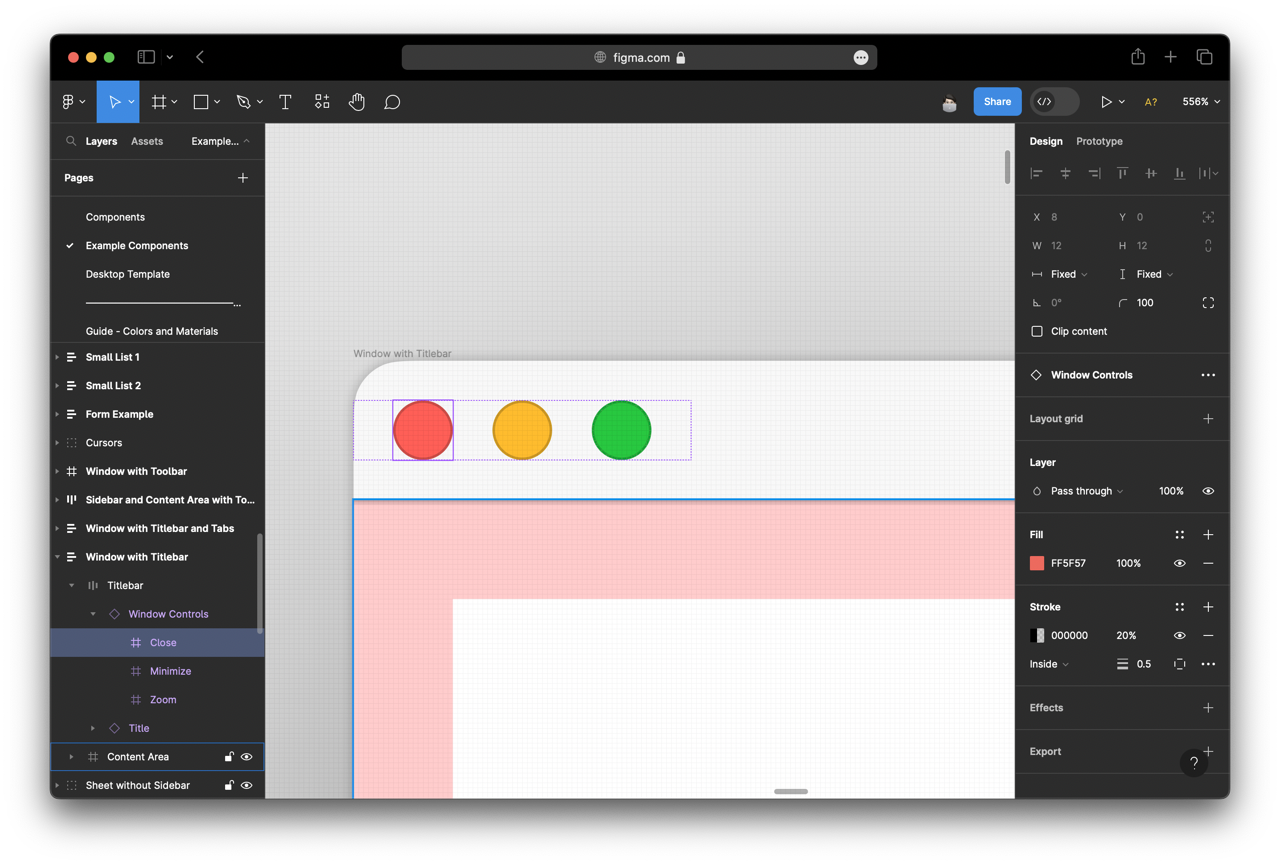
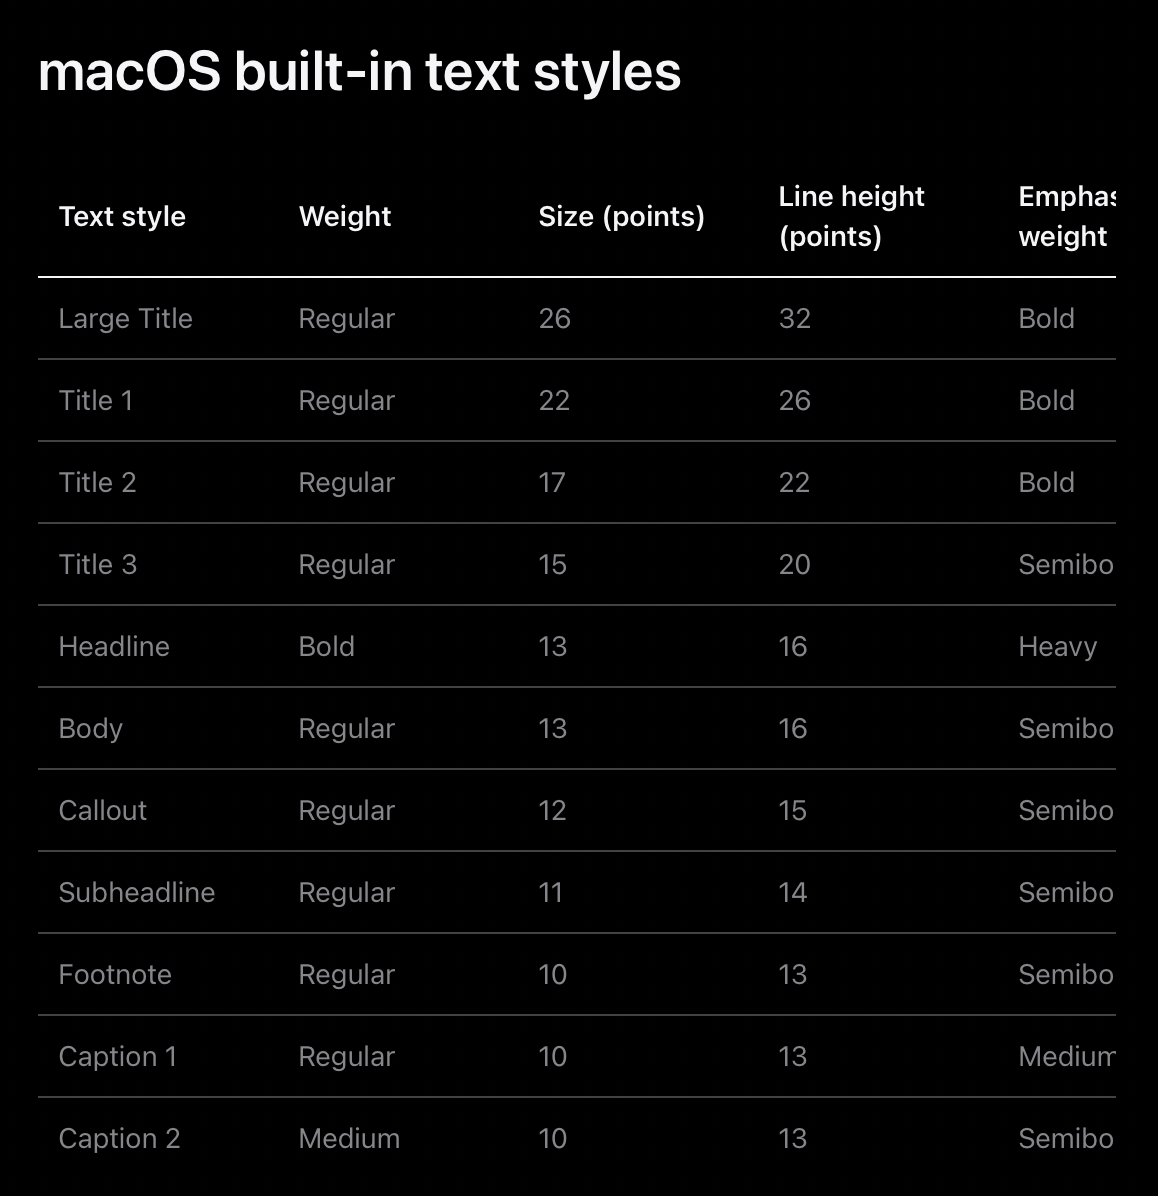
设计规范
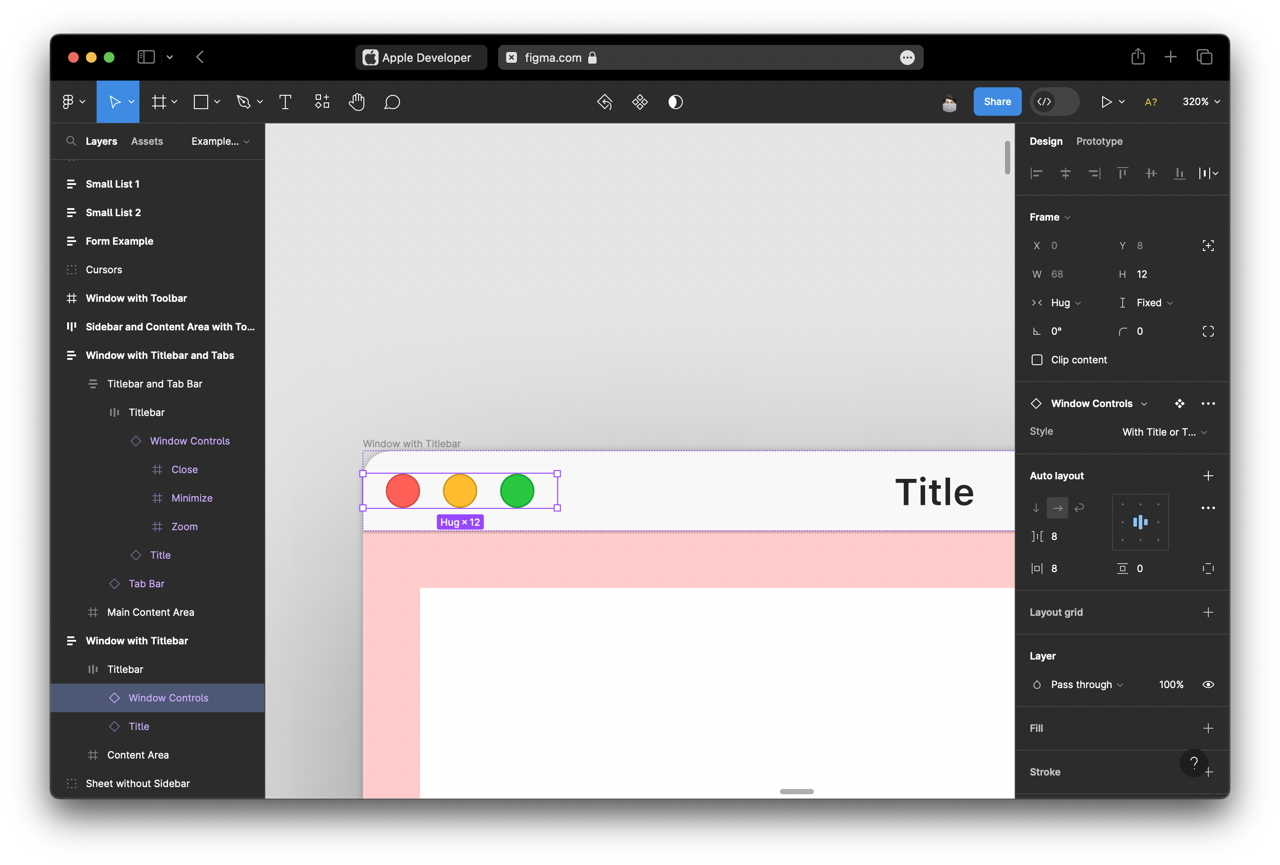
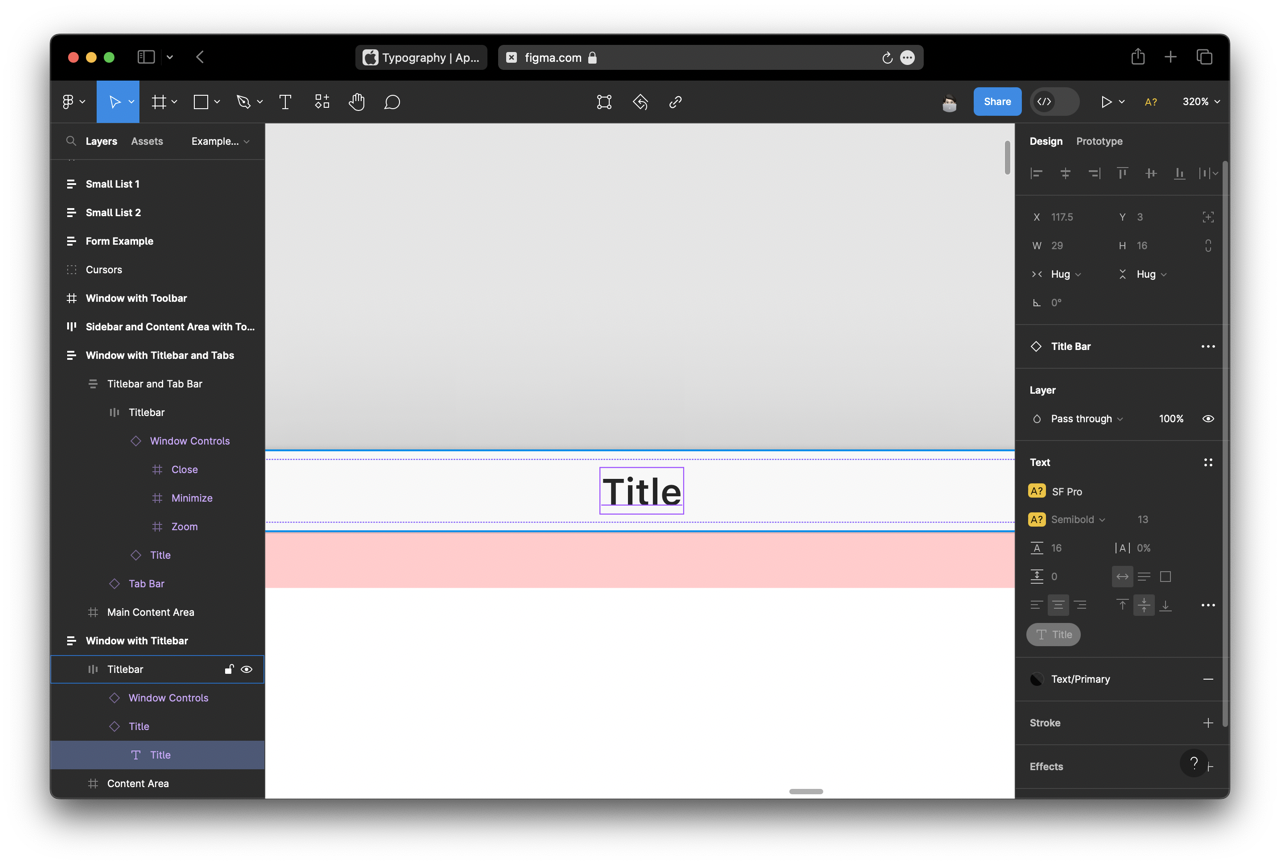
这里可以参考 Developer 网站上的 Figma 资源来查看具体每个元素的宽高和间距等信息。
这样可以尽最大可能的还原 macOS 的风格。
代码实现
思路是:构建标题栏 -> 文本混排+实现光标闪动 -> 接收输入
构建标题栏
1
2
3
4
5
6
7
8
9
10
11
12
13
14
15
16
17
18
| import SwiftUI
struct TrafficLights: View {
var body: some View {
HStack(spacing: 8) {
let colors: [Color] = [.red, .yellow, .green]
ForEach(colors, id: \.self) {
Circle()
.foregroundStyle($0)
.frame(width: 12)
.overlay {
Circle()
.stroke(Color.black.opacity(0.2), lineWidth: 0.5)
}
}
}
}
}
|
1
| @Environment(\.colorScheme) private var colorScheme
|
1
2
3
4
5
6
7
8
9
10
11
12
13
14
15
16
| TrafficLights()
.frame(maxWidth: .infinity, alignment: .leading)
.overlay {
Text("username — -zsh — 100x30")
.font(.footnote.weight(.bold))
}
.padding(8)
.background(.bar)
.overlay {
GeometryReader { proxy in
UnevenRoundedRectangle(topLeadingRadius: 8, topTrailingRadius: 8)
.stroke(.foreground.opacity(colorScheme == .dark ? 0.15 : 0.3), lineWidth: 0.33)
.frame(height: proxy.size.height + 1)
}
}
.clipped()
|
这里让高度+1然后clipped的原因是:等会儿我们的内容区域也要这么加一个描边,为了防止两个描边重叠导致颜色加深,我们忽略 titlebar 的底部描边,保留内容区域的顶部描边。
2023.7.25 更新
这里的实现存在问题,当窗口标题文本过长时会和🚥重叠。
仔细观察macOS原生的实现,可以发现其表现为:
- 空间充足时:居中显示标题
- 空间不足时:优先靠右显示
- 空间过小时:裁切文本显示省略号,仍保持右侧8个像素的间距
我认为这里的难点在于:要动态的修改标题的对齐方式。
我的实现如下:
1
2
3
4
5
6
7
8
9
10
11
12
13
14
15
16
17
18
19
20
21
22
23
24
25
26
27
28
29
30
31
| struct WindowTitleBar<Title: View>: View {
@ViewBuilder var title: () -> Title
@Environment(\.colorScheme) private var colorScheme
var body: some View {
HStack(spacing: 0) {
TrafficLights().padding(8)
Spacer(minLength: 0)
title()
.font(.footnote.bold())
.layoutPriority(1)
Spacer(minLength: 0)
Color.clear
.frame(minWidth: 8, maxWidth: 52 + 8 * 2)
}
.frame(maxWidth: .infinity)
.frame(height: 28)
.lineLimit(1)
.font(.footnote.bold())
.background(.bar)
.overlay {
GeometryReader { proxy in
UnevenRoundedRectangle(topLeadingRadius: 8, topTrailingRadius: 8)
.stroke(.foreground.opacity(colorScheme == .dark ? 0.15 : 0.3), lineWidth: 0.33)
.frame(height: proxy.size.height + 1)
}
}
.clipped()
}
}
|
解释下原理(从左到右):
TrafficLights().padding(8) 略。Spacer(minLength: 0) 两个成对用于居中标题文本。.layoutPriority(1) 让标题布局优先级更高,在空间不足时把优先布局标题。Color.clear 右侧边距,与 TrafficLights() 保持一致宽度,确保在空间充足时相对于整个标题栏(包括左侧🚥)居中,若空间不足,也要始终保持宽度为8,留出与左侧相同的间距。
文本混排+实现光标闪动
文本混排比较简单,使用多个 Text 串联即可,在结尾加上光标(▉) 。
1
2
3
4
5
6
7
8
9
10
11
12
| Group {
Text("Login at: \(Date.now.formatted()).\n")
+
Text("▉")
}
.monospaced()
.padding(4)
.frame(maxWidth: .infinity, maxHeight: .infinity, alignment: .topLeading)
.overlay {
UnevenRoundedRectangle(bottomLeadingRadius: 8, bottomTrailingRadius: 8)
.stroke(.foreground.opacity(colorScheme == .dark ? 0.15 : 0.3), lineWidth: 0.33)
}
|
这里就是我们的内容区域,同样需要加上描边,我们使用 SwiftUI 5 新增的 UnevenRoundedRectangle 来控制四周圆角
光标闪动就是让光标以固定的时间间隔改变样式,在文本混排中,可以使用 .foregroundColor(iOS 17之前) / .foregroundStyle(iOS 17+) 来对文本颜色、样式进行调整。
参考 HIG,可以这么修改:
1
2
3
4
5
6
7
8
9
10
| enum CursorStyle {
case transparent, opaque
mutating func toggle() {
switch self {
case .opaque: self = .transparent
case .transparent: self = .opaque
}
}
}
|
1
| @State private var cursorStyle = CursorStyle.opaque
|
1
2
3
4
5
| Group {
...
Text("▉").foregroundStyle(cursorStyle == .transparent ? .clear : Color(white: 0.45))
}
.task(priority: .background) { changeCursorStyle() }
|
1
2
3
4
5
6
7
| private func changeCursorStyle() {
Task {
try? await Task.sleep(for: .seconds(0.5))
cursorStyle.toggle()
changeCursorStyle()
}
}
|
接收输入
这里使用 TextEditor,但是不能直接让它显示出来覆盖页面,且 Editor 内的文本也不要显示,且要保留点击获得焦点的能力。
最简单的方式就是 .opacity(0.001),搞定。
1
2
3
4
5
6
7
8
9
10
11
| @State private var userInput = ""
Group {
...
Text(userInput)
...
}
...
.overlay {
TextEditor(text: $userInput).opacity(0.001)
}
|
还有一点要注意的是,我们要:
- 禁用系统的自动改正(auto-correction):
.autocorrectionDisabled()
- 禁用自动首字母大写(auto-capitalization):
.textInputAutocapitalization(.never)
- 禁用文本预测(text-prediction):
.keyboardType(.asciiCapable)
大功告成,接下来,你只需要根据自己需求来处理命令即可,我这里的方式是在文本变化时 .onChange(of: userInput) 检测最后一个字符是否为换行来决定是否执行,对于不同的命令如何执行这部分大家可以自己发挥想象。
存在的问题
由于 TextEditor 隐藏了,用户无法直接看到光标在哪里,这里的光标永远在最后,无法根据 TextEditor 中的光标位置移动,使用外置键盘可以修改光标位置,这时候会比较annoying😡
可以考虑使用 Selection Range in SwiftUI 来解决,但是由于是 Hack 方法,可能会导致其他的问题。
吐槽下 SwiftUI 到现在都没支持文本选择的范围。
也不知道 SwiftUI 5 的 TextEditorStyle 会不会给我们带来什么惊喜?
发过反馈:FB12340578,坐等。