在 SwiftUI 中,没有提供默认的 modifier 来监听 TextView 的 selectionRange,
这对于文本编辑类 app 来说是很致命的,因为无法控制光标的位置,
但是可以从其他的文章中找到一些思路:
寻找 NSView / UIView 的方法来源于:siteline/SwiftUI-Introspect
本文来介绍一种解决方案,可以实现出以下的代码:
1
2
3
4
5
6
7
8
9
10
11
| import SwiftUI
struct Example: View {
@State private var selectionRange = NSRange()
@State private var text = ""
var body: some View {
TextEditor(text: $text)
.selectionRange($selectionRange)
}
}
|
原理
首先从 SwiftUI 的底层入手,
SwiftUI 在构建 View 时会使用到 NSView(Controller) / UIVIew(Controller),
在他们的上层还会包一层 ViewHost,
类似这样:
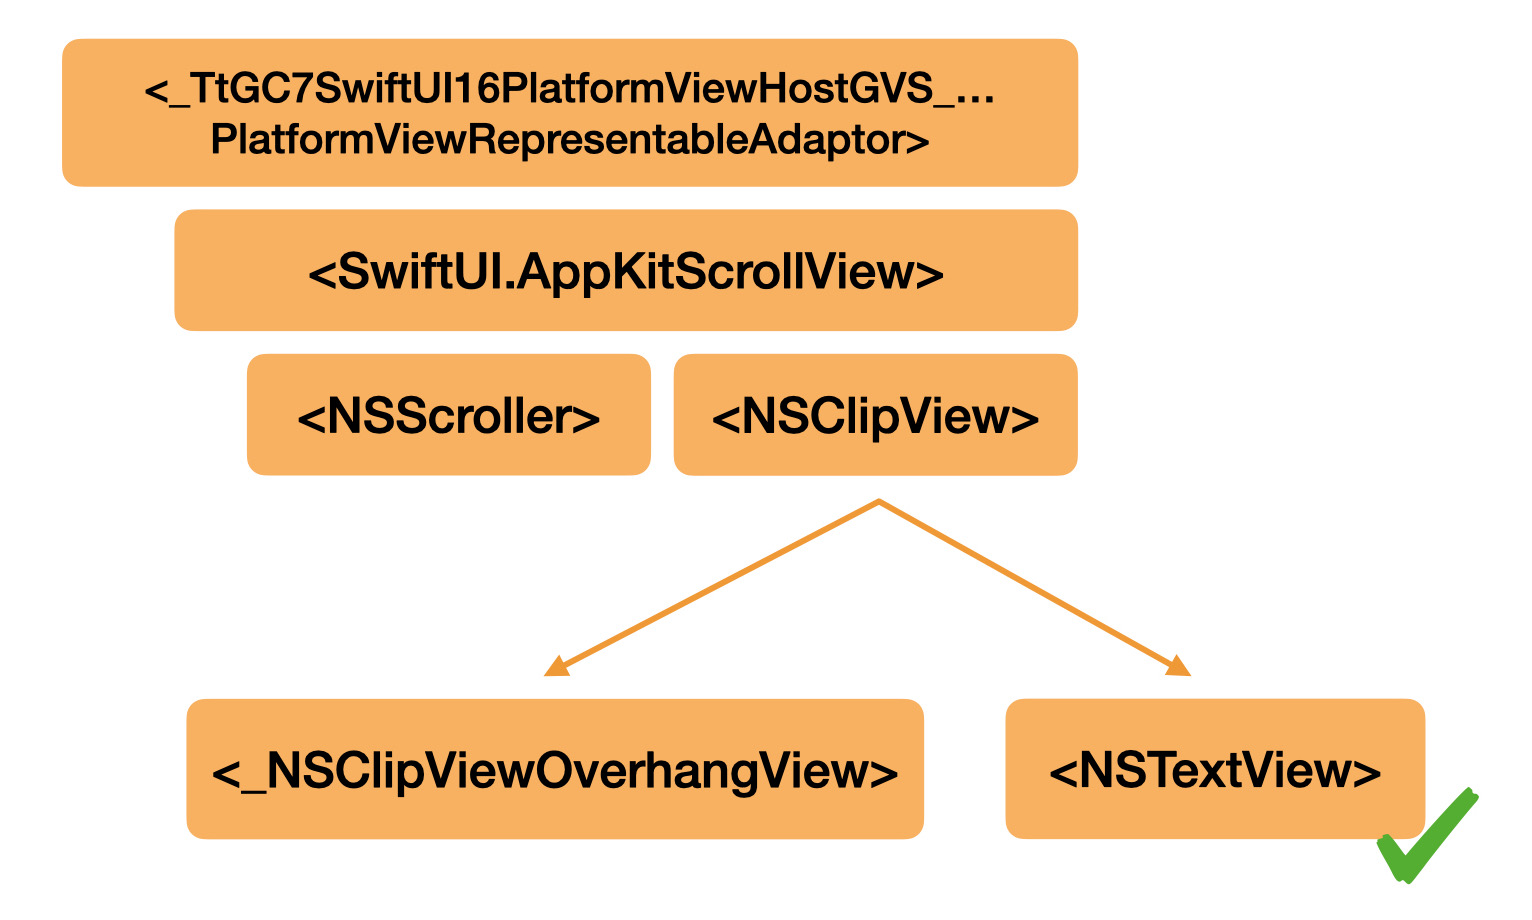
只要我们顺着 ViewHost 找到了对应的 NSView(Controller) / UIVIew(Controller),
就能实现对控件的自定义更改。
代码实现
STEP 1: 寻找 NSTextView / UITextView
1
2
3
4
5
6
7
8
9
10
11
12
13
14
15
16
17
18
19
20
21
22
23
24
25
26
27
28
29
30
31
32
33
34
35
36
37
38
39
40
41
42
43
44
45
46
47
48
49
50
51
52
| fileprivate class _TextViewFinder: PlatformView {
init() {
super.init(frame: .zero)
isHidden = true
}
public override func hitTest(_ point: NSPoint) -> PlatformView? {
return nil
}
@available(*, unavailable)
required init?(coder: NSCoder) {
fatalError("init(coder:) has not been implemented")
}
func findTextView(view: PlatformView?) -> TextView? {
var superview = view
while let s = superview {
if NSStringFromClass(type(of: s)).contains("ViewHost") {
let viewHost = s
guard let superview = viewHost.superview,
let entryIndex = superview.subviews.firstIndex(of: viewHost),
entryIndex > 0
else {
return nil
}
for subview in superview.subviews[0..<entryIndex].reversed() {
if let typed = findChild(in: subview) {
return typed
}
}
return nil
}
superview = s.superview
}
return nil
}
private func findChild(in root: PlatformView) -> TextView? {
for subview in root.subviews {
if let typed = subview as? TextView {
return typed
} else if let typed = findChild(in: subview) {
return typed
}
}
return nil
}
}
|
1
2
3
4
5
6
7
| #if os(macOS)
fileprivate typealias TextView = NSTextView
fileprivate typealias PlatformView = NSView
#elseif !os(watchOS)
fileprivate typealias TextView = UITextView
fileprivate typealias PlatformView = NSView
#endif
|
1
2
3
4
5
6
7
8
9
10
11
12
13
14
15
16
17
| fileprivate struct _TextViewFinderWrapper: ViewRepresentable {
@Binding var textView: TextView?
typealias _Finder = _TextViewFinder
func makeView(context: Context) -> _Finder {
_TextViewFinder()
}
func updateView(_ finder: _Finder, context: Context) {
DispatchQueue.main.async {
if let textView = finder.findTextView(view: finder.superview) {
self.textView = textView
}
}
}
}
|
1
2
3
4
5
6
7
8
9
10
11
12
13
14
15
16
17
18
19
20
21
22
23
24
25
26
27
28
29
| #if os(macOS)
protocol ViewRepresentable: NSViewRepresentable {
associatedtype NSViewType
func makeView(context: Context) -> NSViewType
func updateView(_ nsView: NSViewType, context: Context)
}
extension ViewRepresentable {
func makeNSView(context: Context) -> NSViewType {
makeView(context: context)
}
func updateNSView(_ nsView: NSViewType, context: Context) {
updateView(nsView, context: context)
}
}
#else
protocol ViewRepresentable: UIViewRepresentable {
associatedtype UIViewType
func makeView(context: Context) -> UIViewType
func updateView(_ uiView: UIViewType, context: Context)
}
extension ViewRepresentable {
func makeUIView(context: Context) -> UIViewType {
makeView(context: context)
}
func updateUIView(_ uiView: UIViewType, context: Context) {
updateView(uiView, context: context)
}
}
#endif
|
利用 finder.findTextView 寻找 TextView 并且将其保存到 textView,
使用 @Binding 可以使其生命周期与视图保持同并与上层视图同步信息。
STEP 3: 用 _TextViewFinderWrapper 来寻找对应的 NSView / UIView
overlay 相当于 AppKit 和 UIKit 中的 addSubview,
使用 superview 即可找到上层的 ViewRepresentation 也就是 SwiftUI View,
可以写一个 ViewModifier
1
2
3
4
5
6
| fileprivate struct _SelectionRangeModifier: ViewModifier {
func body(content: Content) -> some View {
content
.overlay(_TextViewFinderWrapper(textView: $textView).frame(width: 0, height: 0))
}
}
|
STEP 4: 实现 selectionRange 的双向绑定
向上绑定:
1
2
3
4
5
6
| .onReceive(
NotificationCenter.default.publisher(for: TextView.didChangeSelectionNotification, object: textView)
) { _ in
}
|
向下绑定:
封装起来大致是这样的:
1
2
3
4
5
6
7
8
9
10
11
12
13
14
15
16
17
18
19
20
21
22
23
24
25
| fileprivate struct _SelectionRangeModifier: ViewModifier {
@Binding var range: NSRange
@State private var textView: TextView?
func body(content: Content) -> some View {
content
.overlay(_TextViewFinderWrapper(textView: $textView).frame(width: 0, height: 0))
#if os(macOS)
.onReceive(
NotificationCenter.default.publisher(for: TextView.didChangeSelectionNotification, object: textView)
) { _ in
guard let textView else { return }
range = textView.selectedRange()
}
#endif
.task(id: range) {
let newRange = range
#if os(macOS)
textView?.setSelectedRange(newRange)
#else
textView?.selectedRange = newRange
#endif
}
}
}
|
STEP 5: 扩展一下 View
1
2
3
4
5
6
7
| extension View {
@available(watchOS, unavailable)
@available(iOS 13.0, macOS 10.15, tvOS 13.0, *)
func selectionRange(_ range: Binding<NSRange>) -> some View {
modifier(_SelectionRangeModifier(range: range))
}
}
|
好啦,搞定!
小问题